Creating And Reading Excel Workbook In Python
Creating and reading Excel Workbook is an important task. The openpyxl module is a powerful library in Python for creating and manipulating Excel files (both .xlsx and .xlsmformats). This blog post will guide you through the basics of creating and reading Excel workbook using openpyxl.
Installing openpyxl
Before using openpyxl, ensure it is installed in your Python environment. You can install it via pip:
pip install openpyxl
1. Creating an Excel Workbook
Creating a new Excel workbook with openpyxl is straightforward. You can also add sheets, write data, and save the workbook.
e.g.
from openpyxl import Workbook

# Create a new workbook
wb = Workbook()

# Get the default active sheet
sheet = wb.active

# Rename the sheet (optional)
sheet.title = "DataSheet"

# Write data to cells
sheet["A1"] = "Name"
sheet["B1"] = "Age"
sheet["A2"] = "John"
sheet["B2"] = 30

# Save the workbook
wb.save("output.xlsx")
print("Workbook created and saved as output.xlsx")
2. Reading an Excel Workbook
To read an existing workbook, openpyxl provides methods to load the file and access its sheets and cells.
e.g.
from openpyxl import load_workbook

# Load an existing workbook
wb = load_workbook("input.xlsx")

# Access a specific sheet
sheet = wb["DataSheet"]

# Read data from cells
print(sheet["A1"].value)  # Output: Name
print(sheet["B1"].value)  # Output: Age
print(sheet["A2"].value)  # Output: Alice
print(sheet["B2"].value)  # Output: 30

# Iterate through rows and columns
for row in sheet.iter_rows(min_row=1, max_row=2, values_only=True):
    print(row)
3. Working with Multiple Sheets
You can create, delete, or access multiple sheets in a workbook.
e.g.
# Add a new sheet
new_sheet = wb.create_sheet(title="Summary")

# Write data to the new sheet
new_sheet["A1"] = "Summary Data"

# Delete a sheet
wb.remove(wb["Summary"])

# Save changes
wb.save("output.xlsx")
4. Styling Cells (Optional)
openpyxl also allows styling cells, including fonts, colors, and alignment. Here’s a quick example:
from openpyxl.styles import Font, Alignment

# Apply styles
sheet["A1"].font = Font(bold=True, color="FF0000")
sheet["B1"].alignment = Alignment(horizontal="center")

# Save changes
wb.save("output.xlsx")
5. Error Handling
Always handle potential errors when working with files, such as file not found or permission issues.
e.g.
try:
    wb = load_workbook("nonexistent.xlsx")
except FileNotFoundError:
    print("The file does not exist.")
Example:
import openpyxl
from openpyxl.styles import Font, Alignment

try:
    wb = openpyxl.Workbook()
    print("Workbook created...")
except:
    print("An error occurred while creating workbook.")

sheet = wb.active

#Set sheet title
sheet.title = "Employee"

#set cell headings text
sheet["A1"] = "Name"
sheet["B1"] = "Age"

#Apply styles to Header Cells
sheet["A1"].font = Font(bold=True, color="FF0000")
sheet["B1"].font = Font(bold=True, color="FF0000")
sheet["A1"].alignment = Alignment(horizontal="center")
sheet["B1"].alignment = Alignment(horizontal="center")

#List of dictionaries
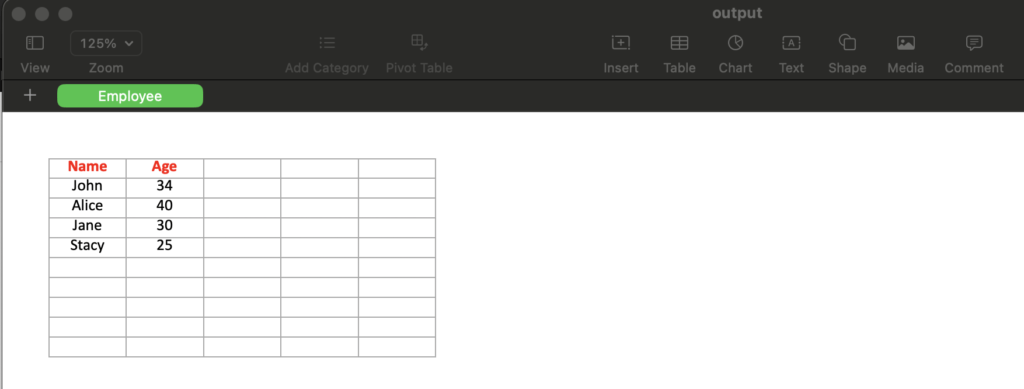
employee = [{"John": 34}, {"Alice": 40}, {"Jane": 30}, {"Stacy": 25}]

#SInitialize starting cell to write List data
i = 2

#Loop through the list
for e in employee:
    for k in e:
        sheet["A" + str(i)] = k
        sheet["A" + str(i)].alignment = Alignment(horizontal="center")
        sheet["B" + str(i)] = str(e[k])
        sheet["B" + str(i)].alignment = Alignment(horizontal="center")
    i = i + 1

#Save Workbook
wb.save("output.xlsx")

#Close workbook
wb.close()
Screenshot of output.xlsx from above example:

Conclusion
The openpyxl library is a versatile tool for creating and manipulating Excel files in Python. From creating workbooks to reading and styling data, it simplifies Excel file handling significantly. Using the examples above, you can start integrating Excel operations into your Python projects seamlessly.
Please visit our Blog page for to read more posts.
Disclaimer: This blog post is for informational purposes only and is provided as it is. Read Disclaimer

